Keeping the home protected and functional during the winter can is a significant challenge for the unprepared homeowner. In addition to ensuring the house is properly insulated and sealed, you also have to be on the lookout for any ice dams that develop after snowfall occurs.
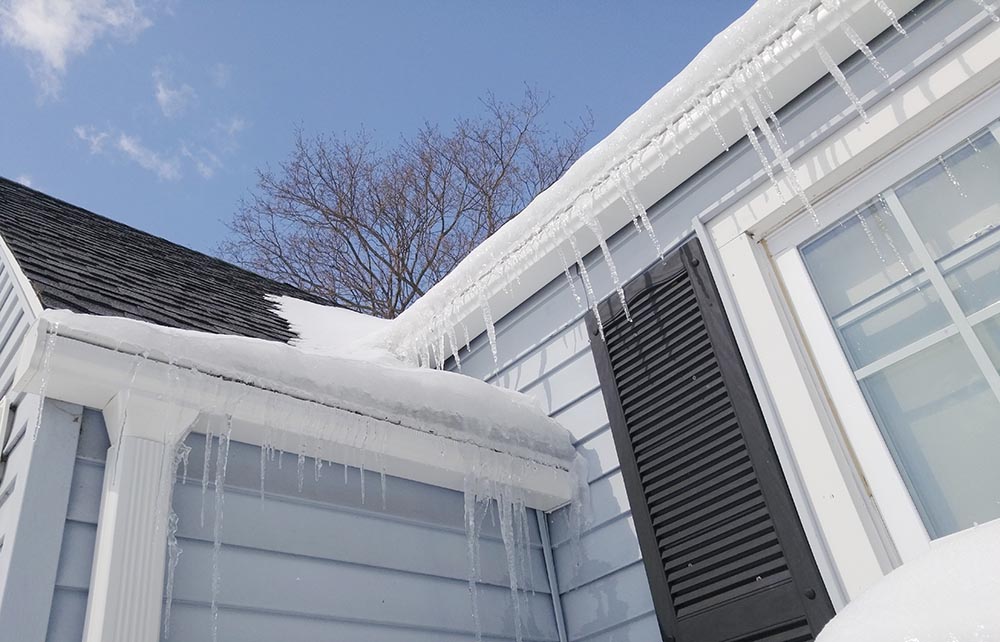
Before we can dive into why ice dams are bad for the roof, we first need to understand what an ice dam is, and more importantly how they form. At its most simple, an ice dam is an icy ridge that forms along the edge of the roof. This is most noticeable in and on the gutter system of the house. When an ice dam forms, this can prevent the flow of water (melting snow) down and away from the house.
An ice dam forms due to an uneven roof surface temperature. At first, the roof is covered by snow. However, different parts of the roof system will heat up to over 32 degrees F while other parts remain below this temperature. When this happens the snow melts and refreezes, and then it turns into ice. The most common reasons for uneven roof surface temperatures are:
- Heat loss from the house
- Different snow levels have different temperatures
- Lack of roof ventilation
- Poor insulation
- Ineffective roofing system
- Damaged gutter and roofing system
If left alone for too long, the ice dam can grow as it enters a near-constant state of melting and refreezing day after day. While these ice dams are basically larger icicles, this can create additional problems for the roof and the house. That’s why it’s important to stay on top of the problem with the help of professional roofers like Kansas City’s team at Smart Exteriors as needed.
Why Ice Dams are Bad
During the warmer parts of the day, layers of ice will melt into water. Unfortunately, the other layers of ice are still present, which means that water begins to pool and seep under the shingles. Shingles are great at protecting against water, but once compromised they remain compromised until the problem is fixed. In the case of water from an ice dam, the water can seep between five-to-ten feet under the shingles. Over time, this water will make its way to the soffits, walls, and ceilings of your home.
Some of the signs of ice dam problems include:
- Rust spots on drywall fasteners
- Peeling paint
- Sagging drywall
- Stains around doors/windows
- Stained ceilings
In most cases, your insurance policy will help cover the damage caused by winter weather. Unfortunately, the coverage is never enough to compensate for the time and energy spent fixing the problem. That’s why it’s much easier to prevent the ice dam from occurring in the first place.
Steps to Fixing the Problem
We previously mentioned that it’s the uneven temperatures between the roof, attic, and outside temperatures that create ice dams. The easy solution is to keep both the roof and the attic at a colder temperature to prevent fluctuation.
Keeping the roof colder is as simple as:
Securing the attic bypasses: The average home loses about a third of its heat through the ceiling into the attic. This is usually caused by air leaks due to gaps in drywall, cracks, unblocked walls, plumbing, chimney, and other ceiling penetrations. While it can be difficult to secure these leaks, it’s worth the effort when you realize ice dams won’t form. You’ll need caulk, foam, and other materials to plug the leaks. Make sure you do this task in cool weather, otherwise the heat can be stifling.
Watch your insulation levels: The insulation in your attic is the key to a successful buffer between attic and roof heat. As a general rule, the insulation level should be at about 12-14 inches thick. If any spots are eight inches or less in width, then be sure to add more insulation immediately. Look for areas of the attic that sit under previous ice dam spots if this is a recurring problem for you and yours. Some homeowners may elect to do blown-in insulation since it is more effective than hand-placed options. However, you’ll need the help of a professional to ensure it’s done correctly.
Ventilation is key: The best way to cool the attic down after the previous steps is to ensure you have proper attic ventilation. This can be accomplished by adding roof and soffit vents. Why this works is simple. The more ventilation you have, the colder outdoor air you bring into the attic, which flushes out the warmer air present in the attic. By no means should you attempt to add more vents on your own. Every roof is unique and the wrong angle or opening can cause problems you’re not prepared for. Instead, work with a qualified roofing contractor to determine where you can add more roof and soffit vents.
A Quality Roof to Prevent Ice Dams
Many homeowners have to consider the merits of roof replacement as well as overall roof quality when seeking to avoid ice dams. What if we told you we had some helpful tips for preventing ice dams, as well as knowledge of a roofing material that is nearly ice dam-proof?
The good news is that both exist. Some helpful tips for your current roof include:
Natural roof ventilation: We mentioned the importance of adding more ventilation, but the truth is that it’s always better to install a roof that is naturally well ventilated. As a result, it’s always a good idea to choose a roofing system that is designed to accommodate winter concerns matched by a superior installation.
Check the flashing: Flashing works to keep water from seeping through. When cracked or separated, the hot air from the attic can escape and let the melted water in. Before winter sets in, take the time to have a professional team come out to perform a roof inspection and make any necessary simple yet effective repairs to prevent ice dams from taking root.
Upgrading Your Roof Materials
If a full roof replacement is in your plans and budget, and ice dams are a top concern, consider replacing your roofing materials with a system that’s nearly ice dam-proof.
Unlike wood shingles and other materials, metal rooftops feature a near-perfect defense against ice dams because there’s nothing for the melted ice to adhere to. A case could be made for the ice adhering to the screws holding the metal panels down, but screws provide very little footing—which makes for a very remote possibility of ice dams forming on metal roofing materials.
Shingles, on the other hand, have multiple small layers that make it easy for snow and ice to hold onto and to form ice dams on. By installing a metal roof with a steep pitch, you can minimize your risk of an ice dam to practically zero. Plus, in the very rare event an ice dam could form on this type of roof, the chance of leaks is just as rare so it’s almost as though you’re doubly protected with this option.
If you’re ready to explore your roofing options or need assistance with your ice dams, give us a call to speak with one of our agents about our roofing services at Smart Exteriors. Or, fill out our online form to request a free, in-home assessment and pricing estimate with one of our contractors.